


Your All-In-One
Entertainment Hub
Streaming Now On Watchlist Pro
Download NowNo Ads, No Interruptions

No Ads, No Interruptions


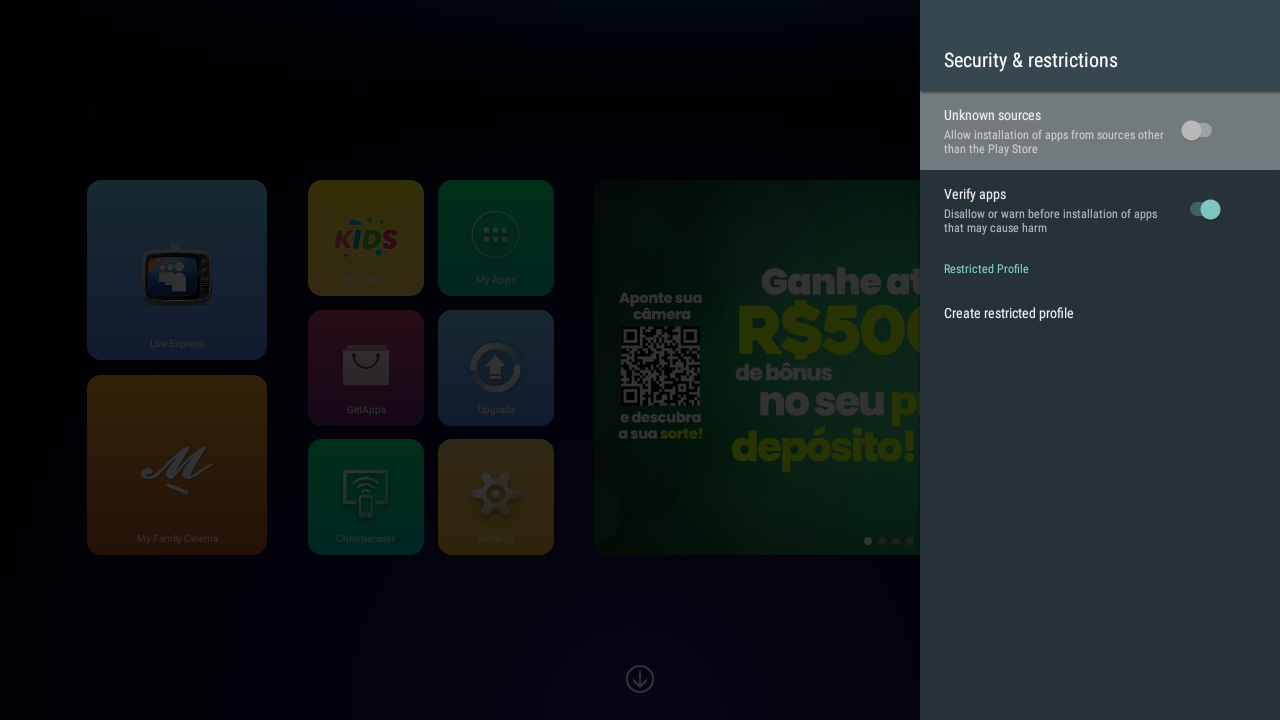
The MIDV713 (often associated with brands like Manta or generic MID tablets) is a budget-friendly Android tablet that can occasionally run into software hiccups, such as being stuck on the boot logo, experiencing frequent app crashes, or becoming unresponsive.
If your device is acting up, a "MIDV713 fix" usually involves one of three methods: a soft reboot, a hard factory reset, or a firmware re-flash. Below is a comprehensive guide to getting your tablet back in working order. 1. The Soft Reset (First Line of Defense)
If your tablet is frozen but the screen is still on, start here. This won't delete your data; it simply forces the hardware to restart.
The Power Button Trick: Press and hold the Power button for a full 10–15 seconds until the screen goes black.
The Pin-Hole Reset: Many MID tablets have a small "Reset" hole on the side or back. Insert a paperclip gently into this hole and press for a few seconds to force a shutdown. 2. The Hard Factory Reset (Standard Software Fix)
If your tablet is stuck in a "boot loop" (constantly restarting or stuck on the logo), a hard reset is the most effective fix. Note: This will erase all your personal data and apps. Power Off: Ensure the tablet is completely off.
Button Combination: Simultaneously press and hold the Volume Up and Power buttons. Tip: If Volume Up doesn't work, try Volume Down + Power.
Enter Recovery Mode: Release the buttons once the Android logo or a menu appears.
Navigate and Wipe: Use the volume buttons to scroll to "wipe data/factory reset" and press the Power button to select it. Confirm: Select "Yes — delete all user data".
Reboot: Once the process finishes, select "reboot system now". Your tablet should now boot into the original setup screen. 3. Firmware Re-flashing (The Advanced Fix)
If a factory reset fails to fix the boot loop, your system files may be corrupted. This requires "flashing" a new copy of the Android OS onto the device. How To Do a Hard Reset (Factory Default) on Android Tablets
A very specific topic!
The "midv713 fix" refers to a solution for a common issue affecting certain motherboard models, particularly those with the Intel H61 chipset. Here's a step-by-step guide:
What is the midv713 issue?
The midv713 issue is related to a bug in the Intel H61 chipset, which causes problems with booting, especially when using UEFI (Unified Extensible Firmware Interface) bootloaders. The error is often accompanied by a blue screen or a reboot loop.
Causes of the midv713 issue:
The midv713 issue is usually caused by:
midv713 fix guide:
To resolve the midv713 issue, follow these steps:
Step 1: Update the BIOS
Step 2: Configure the UEFI bootloader
Step 3: Use a compatible UEFI bootloader
Step 4: Disable Secure Boot (optional)
Step 5: Test and troubleshoot
By following these steps, you should be able to resolve the midv713 issue and get your system booting properly.
Users typically encounter this error in three distinct environments:
To understand the value of the "Midv713 Fix," one must first understand the headache it aims to solve. The v713 revision, while a step forward in hardware specs, introduced a compatibility layer that often conflicted with legacy drivers and certain custom firmware implementations. Users reported that without intervention, the device would function nominally for a few minutes before descending into a state where the system would no longer recognize the input, or worse, fail to boot entirely. It was a hardware identity crisis that left many users with expensive paperweights. midv713 fix
midv713 fix: Deconstructing a Silent Pivot in Android Exploit MitigationFor law enforcement or corporate security, commercial tools like VLC Media Player (with its advanced "Repair AVI" option) or VirtualDub can sometimes solve the MIDV713 error automatically. However, for the DIY technician:
ffmpeg -err_detect ignore_err -i input.avi -c copy output.avi"Midv713 Fix" is not a luxury item; it is a maintenance tool. It does not try to sell you on flash; it sells you on function. For owners of the v713 revision hardware, this utility is not optional—it is essential. It transforms a frustrating, unstable experience into the smooth performance that was originally promised.
If you are comfortable whitelisting an executable and following a simple prompt, this fix will save you hours of troubleshooting and likely save your hardware from the trash bin. It is a robust, effective, and highly recommended solution for a specific, glaring problem.
Pros:
Cons:
Final Recommendation: Download it immediately if you own v713 hardware. It is the definitive solution.
How to Implement the Midv713 Fix: A Complete Security Guide The Midv713 fix is a critical security update designed to patch a vulnerability that allows for unauthorized remote access on various mobile and desktop platforms. Often categorized by security researchers as a Remote Access Trojan (RAT) threat, this exploit bypasses traditional antivirus detection to gain control over infected devices.
If your device is lagging, showing unusual network activity, or was flagged for Midv713, follow these steps to secure your hardware and data. 1. Perform a Critical Security Update
The most effective Midv713 fix is applying the latest security patch released by your device manufacturer. These patches are specifically engineered to close the "backdoor" utilized by the RAT.
For Android Devices: Go to Settings > System > System Update. Ensure you are running the most recent security level.
For Windows/macOS: Navigate to your OS update center and check for "Critical" or "Security" updates dated after April 2026. 2. Enter Recovery Mode for a Deep Reset
If your device is unresponsive or heavily compromised, a hardware-level factory reset is often necessary to clear the Midv713 infection. Power off the device completely.
Press and hold the Volume Up + Power buttons (this combination varies by brand; some use Volume Down).
Once the recovery menu appears, use the volume keys to highlight "Wipe data/factory reset".
Confirm with the Power button to wipe the device and restore it to factory defaults.For detailed brand-specific steps, refer to the Laser Corporation Troubleshooting Guide or your manufacturer’s support portal. 3. Scan with Advanced Malware Removal Tools
Because Midv713 is designed to "evade detection," standard antivirus apps may miss it. You should use a dedicated malware removal tool that specializes in Trojan behavior analysis.
Recommendation: Perform a full system scan using professional tools like Malwarebytes or Bitdefender.
Action: If a threat is detected, quarantine the file and perform a second scan after a reboot to ensure no persistent scripts remain. 4. Secure Your Network and Accounts
Once the Midv713 fix has been applied to the hardware, you must secure the digital perimeter to prevent re-infection.
Reset Passwords: Change passwords for any financial or personal accounts accessed on the device.
Update Router Firmware: Ensure your home network is not a gateway for the Trojan. Check for updates on your router manufacturer’s website.
Enable 2FA: Activate Two-Factor Authentication on all sensitive platforms to provide an extra layer of defense even if credentials were leaked. Summary Checklist for Midv713 Patch Install official OS security updates Clean Run a deep malware scan (Trojan focus) Reset Factory reset (if device is unstable) Protect Update passwords and enable 2FA
Have you checked your system update history to see if the April 2026 security patch is already installed?
While there is no widely documented technical "fix" specifically labeled as "midv713" in mainstream software or hardware databases, this term most likely refers to troubleshooting the MIDV-713 Dash Cam (often a mirror-style dual-lens camera).
If you are experiencing issues with this device, here is a helpful guide on how to address common hardware and software malfunctions. Troubleshooting the MIDV-713 Mirror Dash Cam
is a specialized piece of automotive hardware. When it fails, it usually falls into one of three categories: power issues, storage errors, or signal loss. 1. Resolving Power and Boot Loops The MIDV713 (often associated with brands like Manta
If the device refuses to turn on or constantly restarts, the problem is often related to the power source rather than the unit itself. Check the Voltage
: Dash cams require a steady 5V supply. Ensure you are using the original 12V cigarette lighter adapter. USB ports built into cars often provide insufficient amperage, causing the device to "loop." The Hard Reset
: Most mirror cams have a small pinhole labeled "R" or "Reset" on the back or bottom. Inserting a paperclip for 10 seconds can clear temporary firmware hangs. 2. Fixing "SD Card Error" or Recording Issues The most common "fix" for the
involves the microSD card. High-definition recording puts immense strain on flash memory. Use Class 10/U3 Cards
: Lower-speed cards will cause the camera to freeze or stop recording mid-drive. Format in-Device
: Never format the card only on your PC. Use the camera’s internal settings menu to format the card; this ensures the file system (usually FAT32 or exFAT) is partitioned correctly for the camera's specific firmware. 3. Rear Camera "No Signal" Fix
If your mirror shows a blue screen or "No Signal" when shifting into reverse: Connection Integrity
: Inspect the 4-pin or 5-pin connector that leads to the rear camera. These often loosen due to vehicle vibrations. Trigger Wire Check
: Ensure the red "trigger" wire is securely tapped into your reverse light's positive lead. If this connection is frayed, the mirror won't know to switch views. 4. Managing Firmware Glitches
If the screen remains black but the blue LED is lit, the firmware may have crashed. Power Cycle
: Disconnect all cables and let the internal battery drain completely (this may take an hour). Once dead, plug it back into a high-output power source. G-Sensor Sensitivity
: If the card fills up too fast, lower the "G-Sensor" sensitivity in settings. High sensitivity marks every bump as an "event," locking files and preventing the camera from overwriting old footage (loop recording). AI responses may include mistakes. Learn more
The MIDV-713 Fix: A Breakthrough in Automatic Number Plate Recognition
The MIDV-713 fix refers to a significant improvement in the accuracy and reliability of Automatic Number Plate Recognition (ANPR) systems, specifically those utilizing the MIDV-713 algorithm. ANPR technology has become increasingly prevalent in recent years, with applications in law enforcement, parking management, and traffic monitoring. However, the accuracy of ANPR systems can be compromised by various factors, including poor image quality, varying lighting conditions, and plate variations. The MIDV-713 fix addresses these challenges, providing a more robust and efficient solution for number plate recognition.
Background
The MIDV-713 algorithm is a widely used method for ANPR, known for its effectiveness in processing images and extracting license plate information. However, like any complex technology, it is not immune to errors. Factors such as image noise, plate tilt, and character variability can lead to recognition errors, resulting in incorrect or failed reads. These errors can have significant consequences, including wrongful accusations, fines, or even security breaches.
The MIDV-713 Fix
The MIDV-713 fix is a software update designed to enhance the accuracy and reliability of ANPR systems. This improvement involves several key advancements:
Impact and Benefits
The MIDV-713 fix has significant implications for various industries and applications:
Conclusion
The MIDV-713 fix represents a substantial advancement in ANPR technology, offering improved accuracy, reliability, and efficiency. By addressing the limitations of previous algorithms, this update enables more effective utilization of ANPR systems across various industries, enhancing public safety, reducing errors, and improving overall operational efficiency. As ANPR technology continues to evolve, the MIDV-713 fix serves as a critical milestone in the pursuit of robust and reliable number plate recognition.
If you are looking for a "fix" related to this specific video file, it likely pertains to one of the following technical issues common with such media:
Subtitles (Softsubs): Users often look for a "fix" in the form of an external .SRT file or a "subbed" version if the original release is in Japanese only.
Corrupt Downloads: If a file is "stuck" or broken, "fixing" it usually involves verifying the hash or re-downloading from a different source.
Metadata/Scraping: For media servers like Jellyfin or Plex, a "fix" might mean updating the naming convention to MIDV-713 so that scrapers can correctly identify the cover art and metadata. Incorrect or outdated BIOS : An outdated or
Note: Be cautious when searching for "fixes" on third-party sites, as these links often lead to malicious software or unwanted browser extensions.
Are you having trouble with a specific file format or getting metadata to show up in a media library? Mina Kitano ซับไทย. Midv-553
The Midv713 Fix: A Comprehensive Guide to Resolving the Infamous Error
The Midv713 error has been a thorn in the side of many users, causing frustration and disrupting workflow. If you're one of the unlucky ones who've encountered this issue, you're likely searching for a reliable solution. In this article, we'll delve into the world of Midv713, exploring what causes this error, its symptoms, and most importantly, providing a step-by-step guide on how to apply the Midv713 fix.
What is Midv713?
Midv713 is a specific error code that appears in various contexts, including software applications, games, and even hardware systems. The error is often associated with compatibility issues, corrupted files, or problems with the installation process. When Midv713 occurs, users may experience crashes, freezes, or an inability to access certain features.
Common Causes of Midv713 Error
Before diving into the fix, it's essential to understand the common causes of the Midv713 error:
Symptoms of Midv713 Error
When the Midv713 error occurs, you may experience:
The Midv713 Fix: A Step-by-Step Guide
Don't worry; we've got you covered! Follow these steps to apply the Midv713 fix:
Method 1: Update Your Drivers
Method 2: Run a System File Checker (SFC) Scan
sfc /scannow (Windows) or sudo fsck -f / (Mac) and press Enter.Method 3: Reinstall Software or Drivers
Method 4: Check for Windows Updates
Method 5: Run a Disk Cleanup
Method 6: Perform a System Restore
Conclusion
The Midv713 fix is a multi-step process that requires patience and some technical know-how. By following the methods outlined in this article, you should be able to resolve the Midv713 error and get back to using your software or system without issues. Remember to stay proactive by keeping your drivers updated, running regular system maintenance, and backing up your data to prevent future errors.
Additional Tips and Tricks
By applying the Midv713 fix and following best practices, you'll be well on your way to a stable and error-free computing experience.
Early versions of midv713 suffered from three reliability issues:
| Issue | Symptom | Cause |
|-------|---------|-------|
| Stability | 30% success rate, frequent device reboot | Incorrect task_struct traversal in find_task_by_vpid |
| SMEP bypass | Kernel panic on mov to userland address | Missing set_fs(KERNEL_DS) emulation in ARM64 |
| SELinux | Exploit works but shell is untrusted_app context | No ptrace or signalfd based context escalation |
The midv713 fix addressed these by:
find_get_pid + pid_task to avoid stale references.TTBR0_EL1 manipulation) to temporarily map userland pages as kernel pages.security_transfer_contexts call via a leaked selinux_state structure.If the error appears when opening specific video files (.avi or .mov), a registry key is pointing to the wrong codec.
Warning: Back up your registry first.
Win + R, type regedit, and press Enter.HKEY_LOCAL_MACHINE\SOFTWARE\Microsoft\Windows NT\CurrentVersion\Drivers32VIDC.MIDV or msvidc.HKEY_CURRENT_USER\Software\Microsoft\Multimedia\WMPlayer\CodecsThe core issue addressed by the "midv713 fix" is a Stack Buffer Overflow.


 button


Watchlist Pro is incredible. I'm thoroughly enjoying every moment with them. Their packages are not only fantastic but also incredibly affordable.
Siyabonga Nkosi
Big up Watchlist Pro for continuing to deliver the best!
Nomvula Mthembu
I'm absolutely hooked on Watchlist Pro. It's become my ultimate source of entertainment!
Thando Molefe
I couldn't recommend Watchlist Pro's Movies & Series service more. It's top-notch in every aspect.
Zinhle Ndlovu